
Storytelling in Fashion Photography
Katherine Berg
December 6, 2021
FASHION Photography is Not
only an art, it's also a story. When you have a set of images that is displayed in a particular order, with the goal of inciting a particular reaction, you've created a storyline. Most people do this naturally, without ever realizing that they are telling a story. But once we identify the fact that we are merely storytelling, our visions as creators can become much more clear. Along with storytelling comes an in-depth level of preparation that involves: mapping out the structure of your project, organizing, revisiting; and if necessary, getting an outside perspective to do a final critique. By doing this, you'll gain clarity in the same way that an author would gain clarity after writing out the plot of their book.
When we stray from the concept of storytelling, we risk losing connection with our team and our audience. If you had the option to make your workflow easier and improve your art, why wouldn't you?!
Today's blog is of course on the topic of storytelling in fashion photography, with an emphasis on the creative director and photographer's perspective, and the tasks they can start implementing *today* to improve their craft.
We see all types of artists brainstorming and being guided through their projects with tools like face charts, mood boards, fashion sketches, blueprints... the list goes on! This shouldn’t change when it comes to storytelling in a photo shoot. The only caveat here is that you'll probably be collaborating with other creative minds, which simply means you'll have to take more time and consideration when plotting out the specifics. For instance, if you're working with a stylist and a makeup artist, you can give them a rough draft of your concept, and in return, allow them to give you a face chart or sketch that you can add to your notes. Use these new details to continue conceptualizing your vision, so that when you've completed your final draft, you'll have a collection of ideas from everyone participating in the shoot. Share this with your team, expect possible modifications, and bring the mastered copy on set for everyone to follow. There will be fewer surprises on the day of the shoot and everyone will know the part they have to play. *This* is going to be your fashion photography playbook.
What Happens When you Don't Tell a Story is Every Artists’ Nightmare:
1. The images may seem to look all over the place or not done properly.
2. Your work will make people question if it was done mistakenly, last minute, or if that was the intended look. Yikes.
OR
3. Your work will be void of the appearance of professionalism, causing onlookers to not take you as seriously.
An obvious theme shows confidence in your storytelling capability and helps the viewer follow along smoothly. This doesn't mean that your work is supposed to lack mystery, or a sense of wonder, but it does mean that the viewer shouldn't be lost; they should instead be able to piece together a version of the tale you are trying to tell. Keep reading to learn some helpful routines to use when planning out your next shoot!
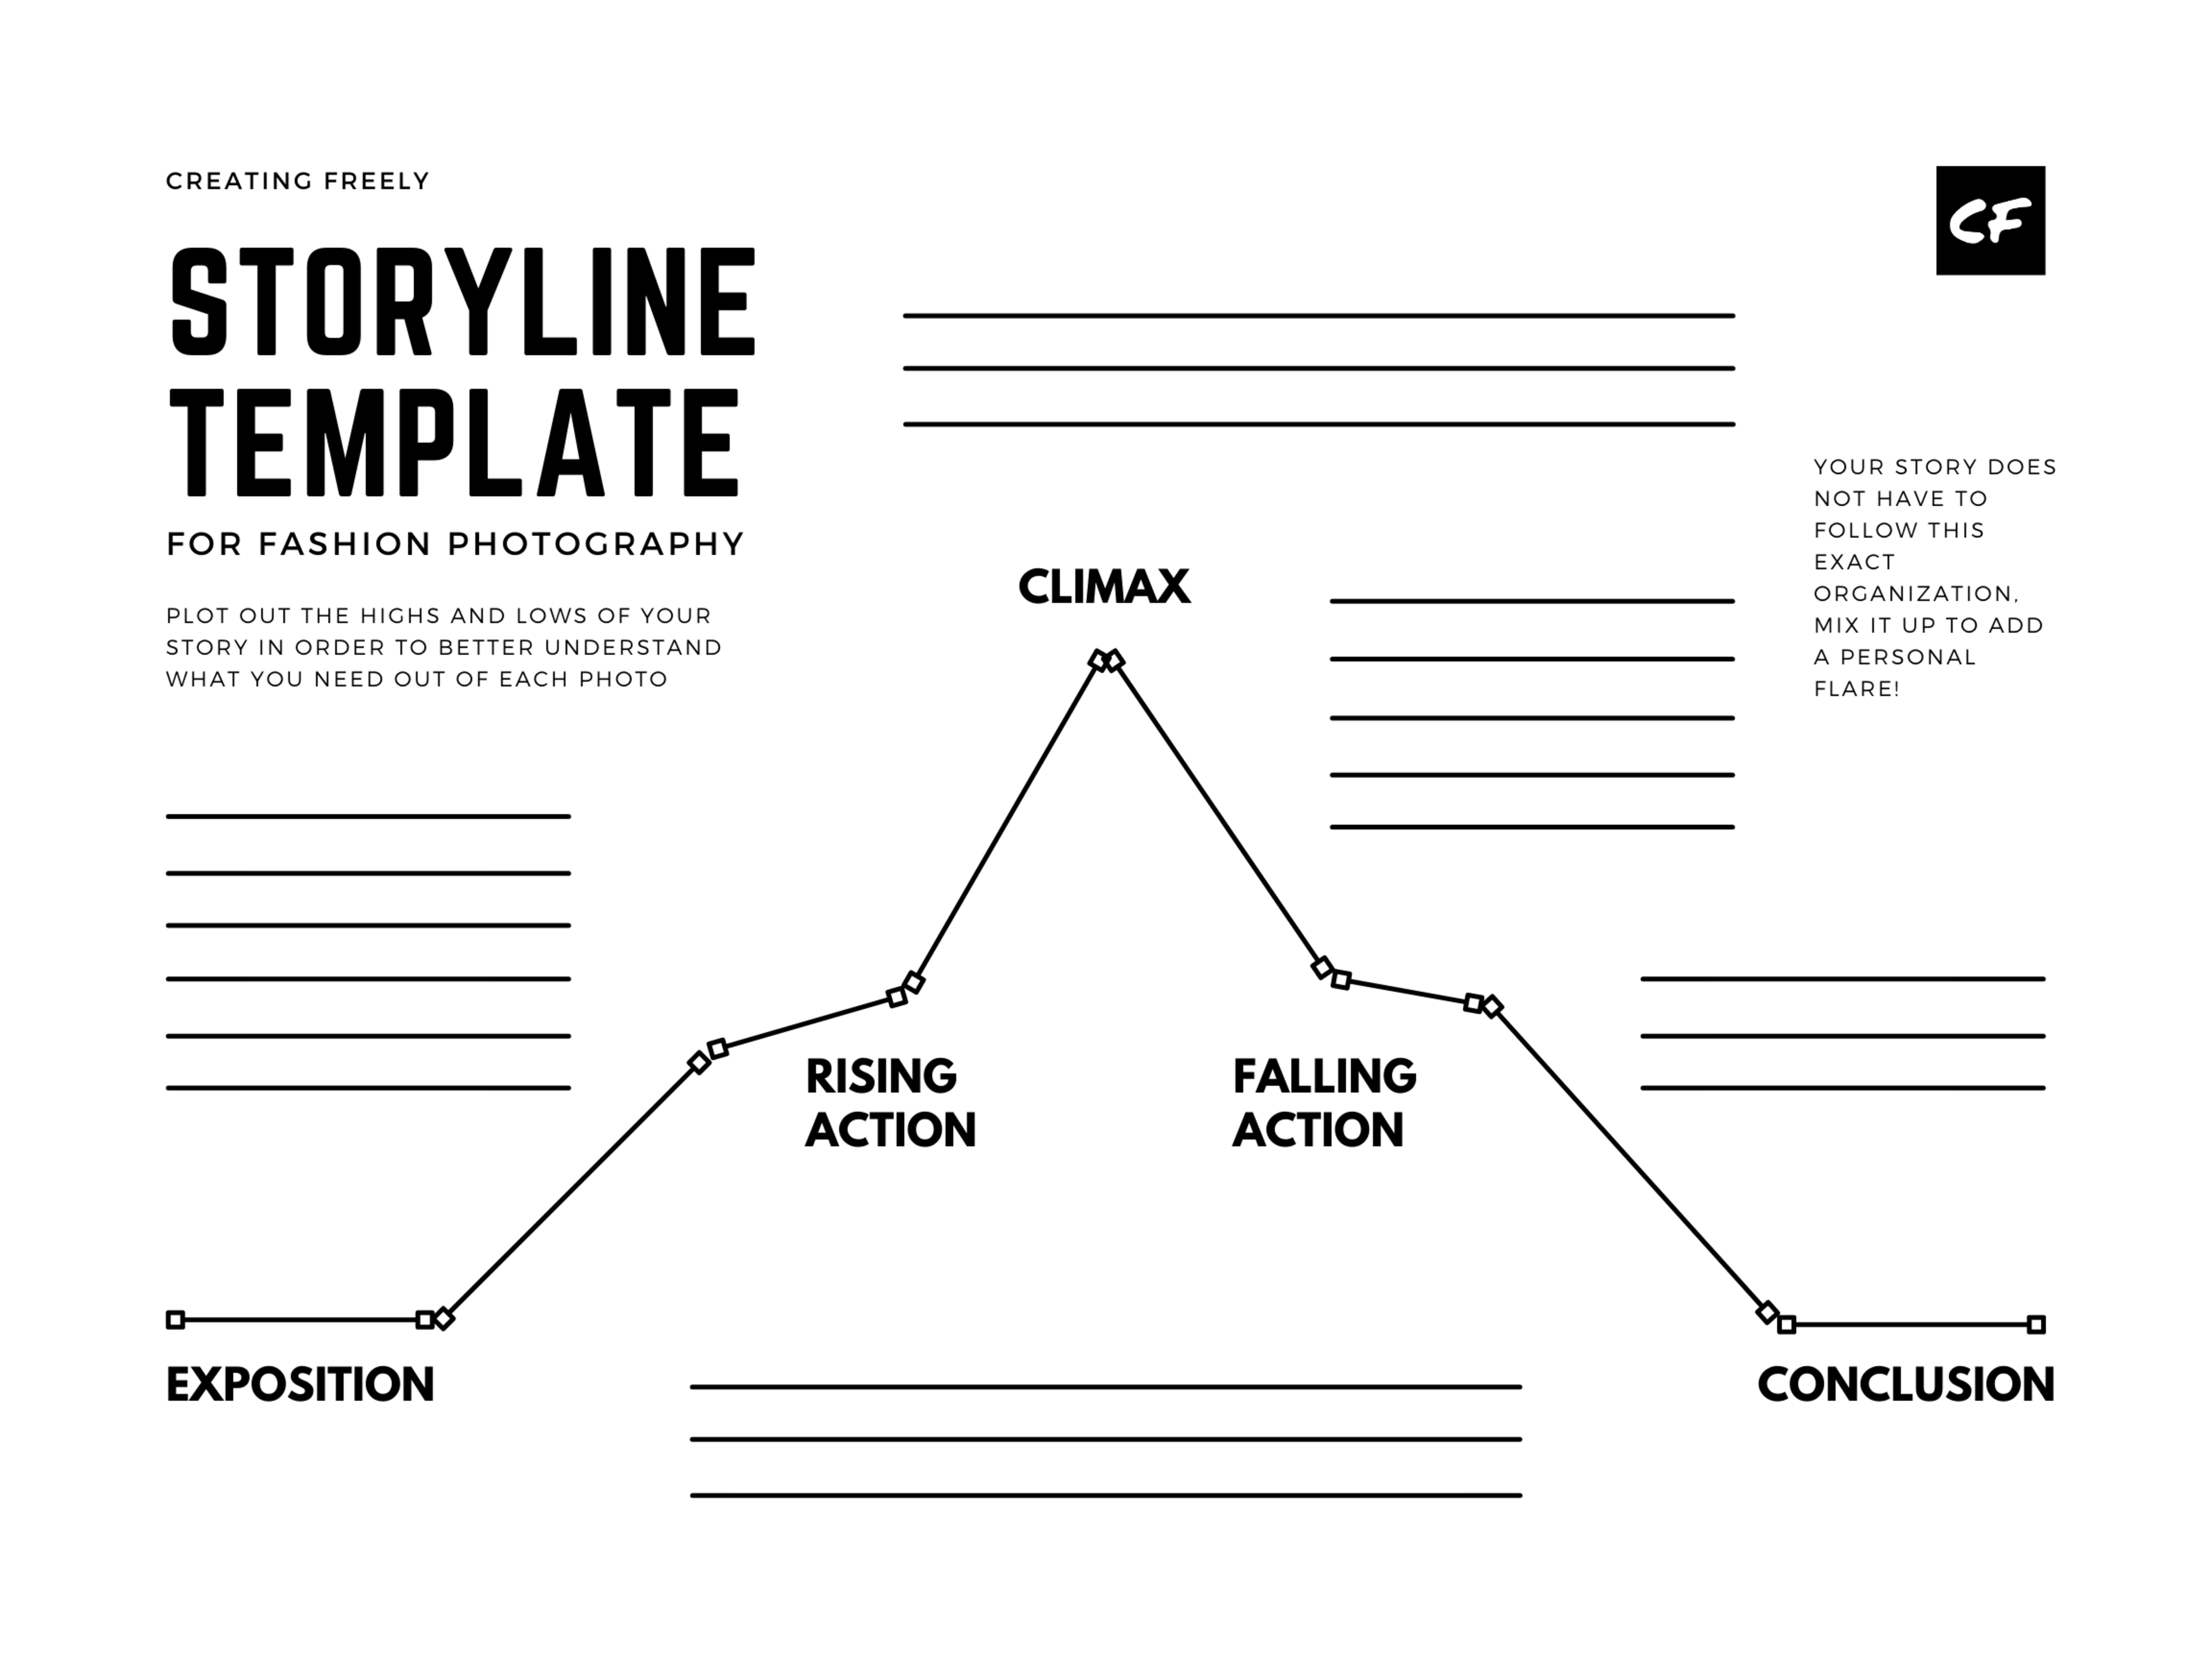
How to Tell a Story
Organization
When telling a story, you should be aiming to grab your viewers attention and lead them on a quest to find out more. To achieve this, you can follow the typical organization of a plot line, which is: exposition, rising action, climax, falling action, and conclusion. After you've established the exposition of the story, each remaining section of your plot represents a different photo or group of photos. The shorter your series of images is, the more descriptive each photo needs to be; you have to clearly show the progression of the storyline in a smaller quantity of images. The longer your photo series is, the more flexibility you have when determining what emotions and components each shot needs. For example, if you've placed 3 photos in the "rising action" section, you can be less direct with the emotion you're trying to embody in each shot than if you only had 1 photo in the "rising action" section. This structure makes it incredibly easy to envision exactly what is required out of each image. You'll be able to better understand the sensations you'd like to evoke, and the colors, poses, facial expressions, and styling you should have in order to do so. This is when you'd take this draft to your team to collaborate and see what they have in mind. Collect any of the ideas they offer up, as well as face charts or sketches they may have made, and continue to finalize the storyline.
Making the Right Connection
Any piece of art can make a connection with its audience, the *key* is to make a lasting impression and leave a wow factor in their minds; this is precisely what editorials are supposed to exhibit. I want you to think of your favorite piece of art and why you came to like it so much. Was it the amount of detail it displayed? Did it leave you in a state of awe? Maybe the colors made you feel an intense emotion, or the main elements related to you in a way that deeply resonated? Whatever it may have been, imitate those special qualities in your own art, with the hopes that you, too, will receive those same reactions from viewers. If you don't have a specific art piece in mind, take inspiration from things like editorials, makeup looks, movies, or runway shows that have a similar theme to your photoshoot. Identify what makes those art statements memorable, and recreate them with your own twist. *A tip, if I may add: Don't claim to use art as "inspiration", only to end up copying and pasting someone else's work entirely. It's one thing to be inspired, and a wholly different thing to replicate. Call it like it is! Don't be a fraud, no one likes frauds.*
Setting the Mood & Staying Cohesive
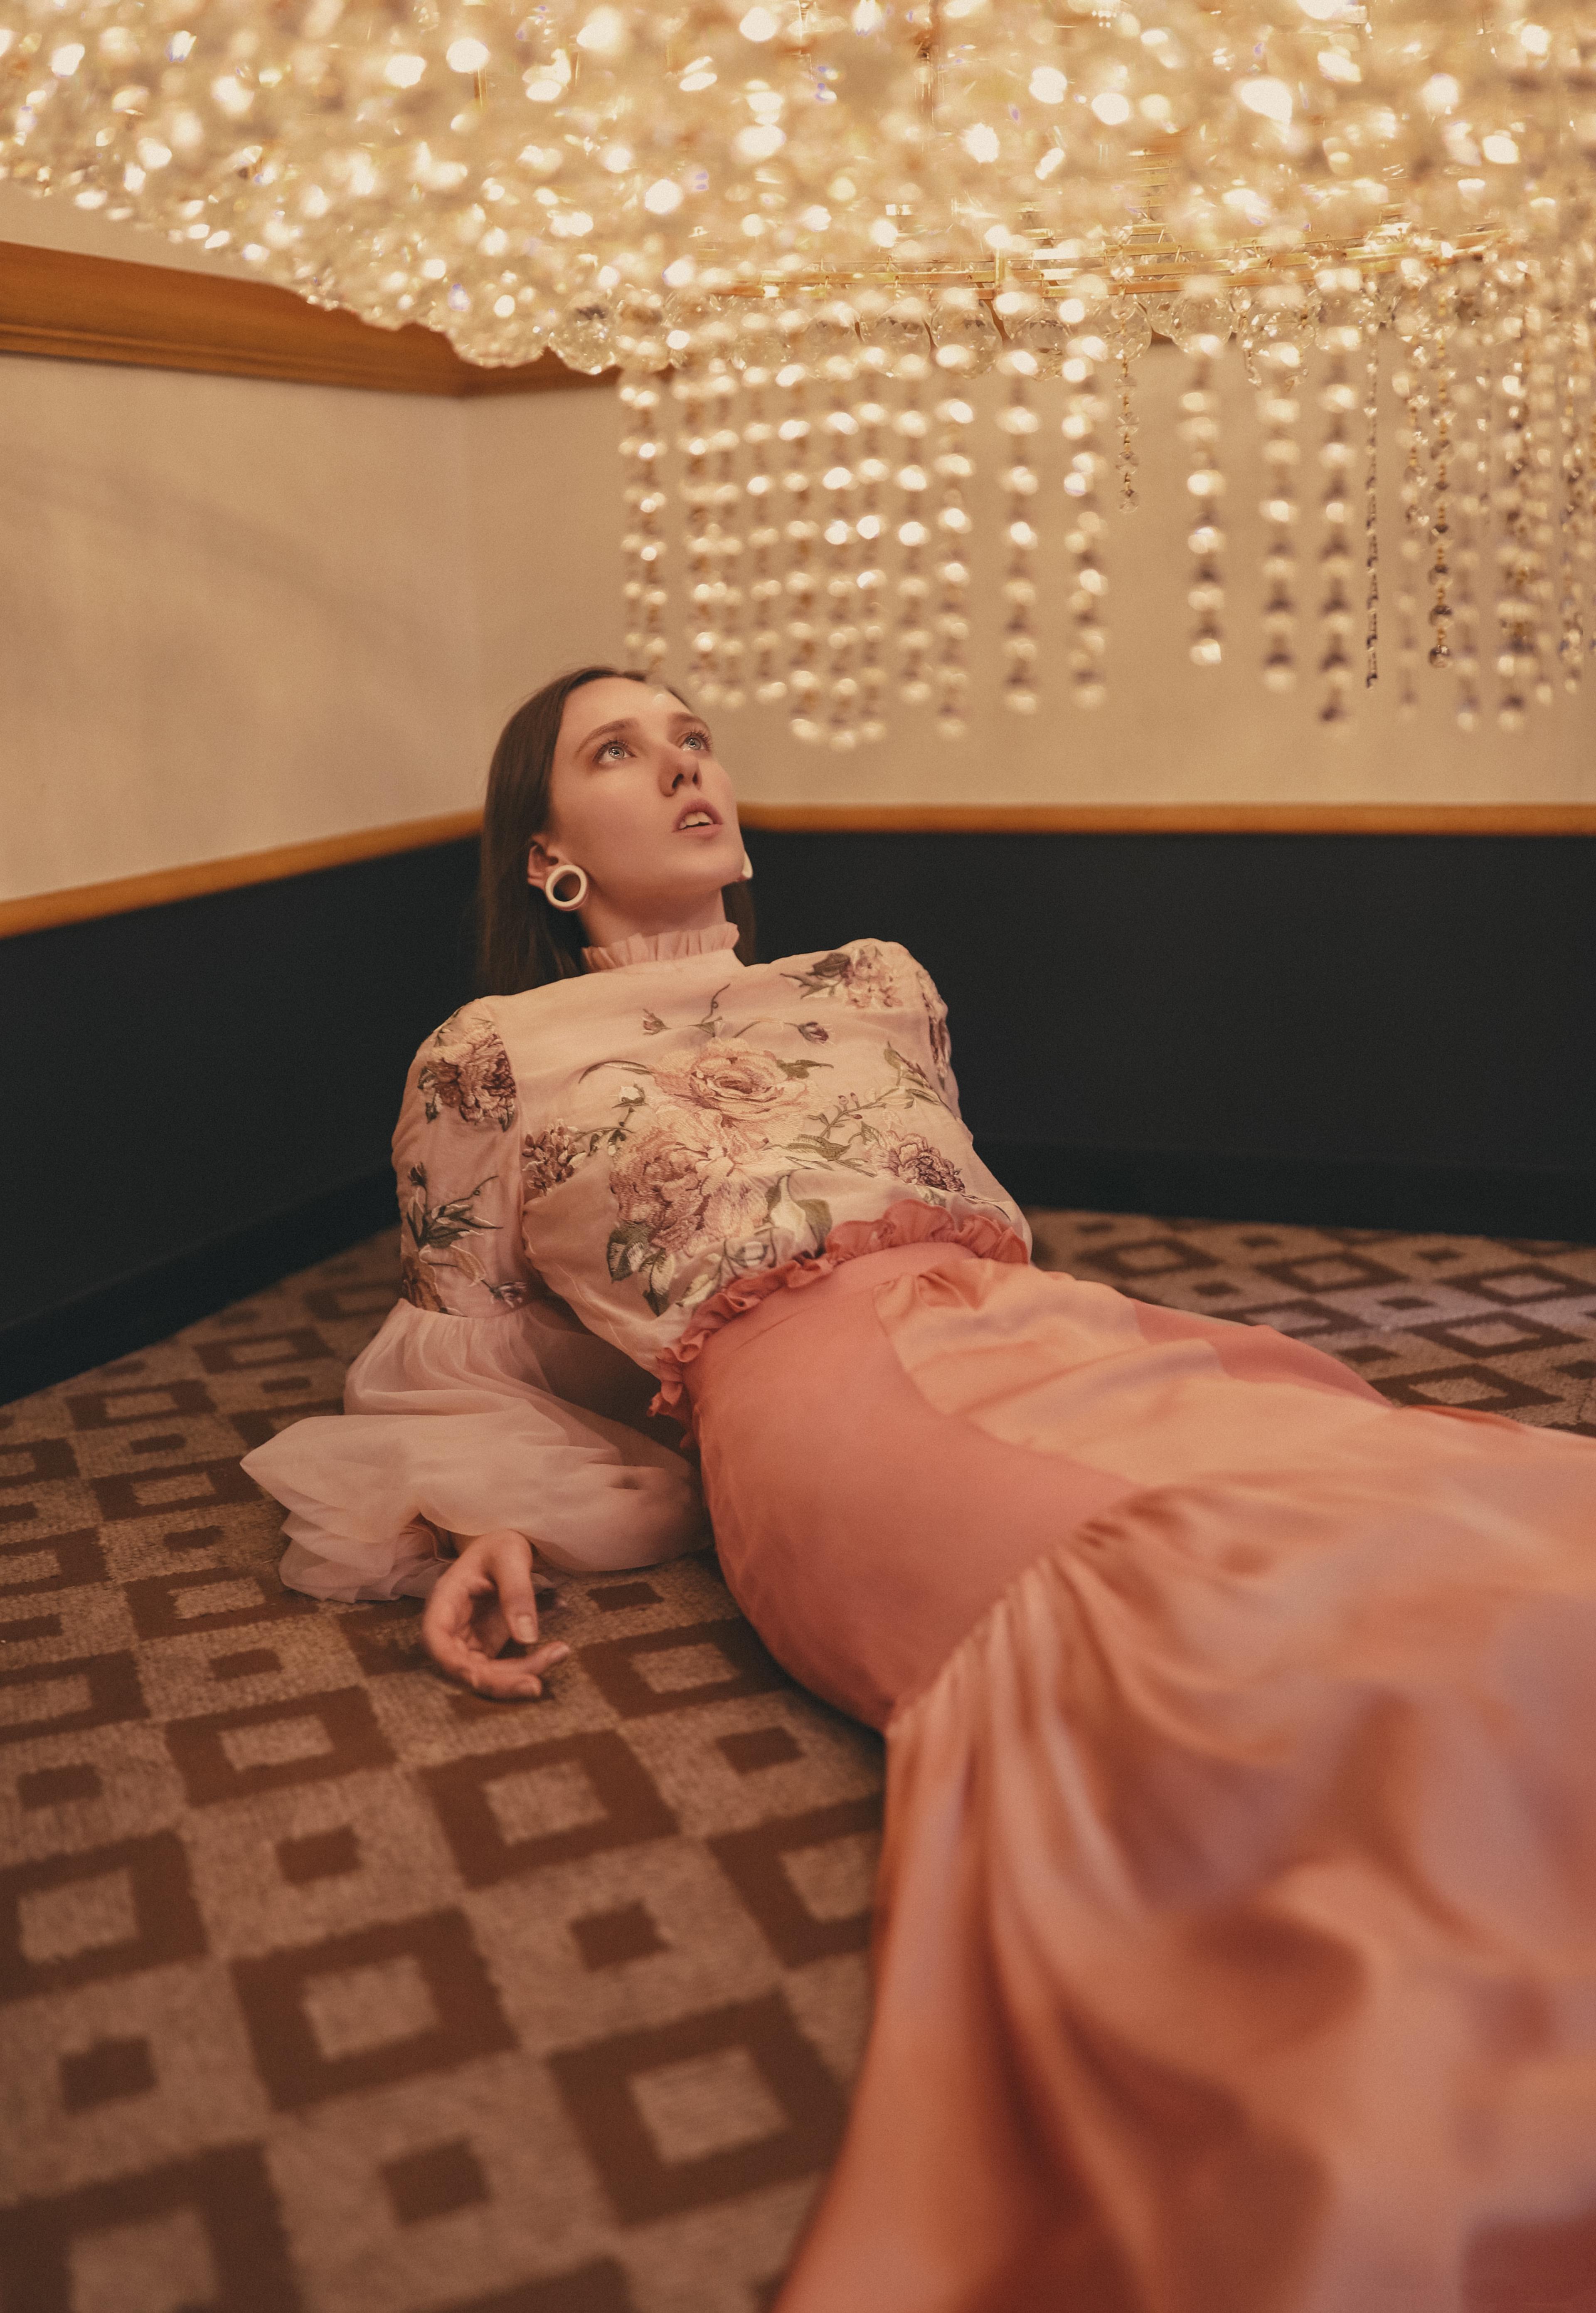
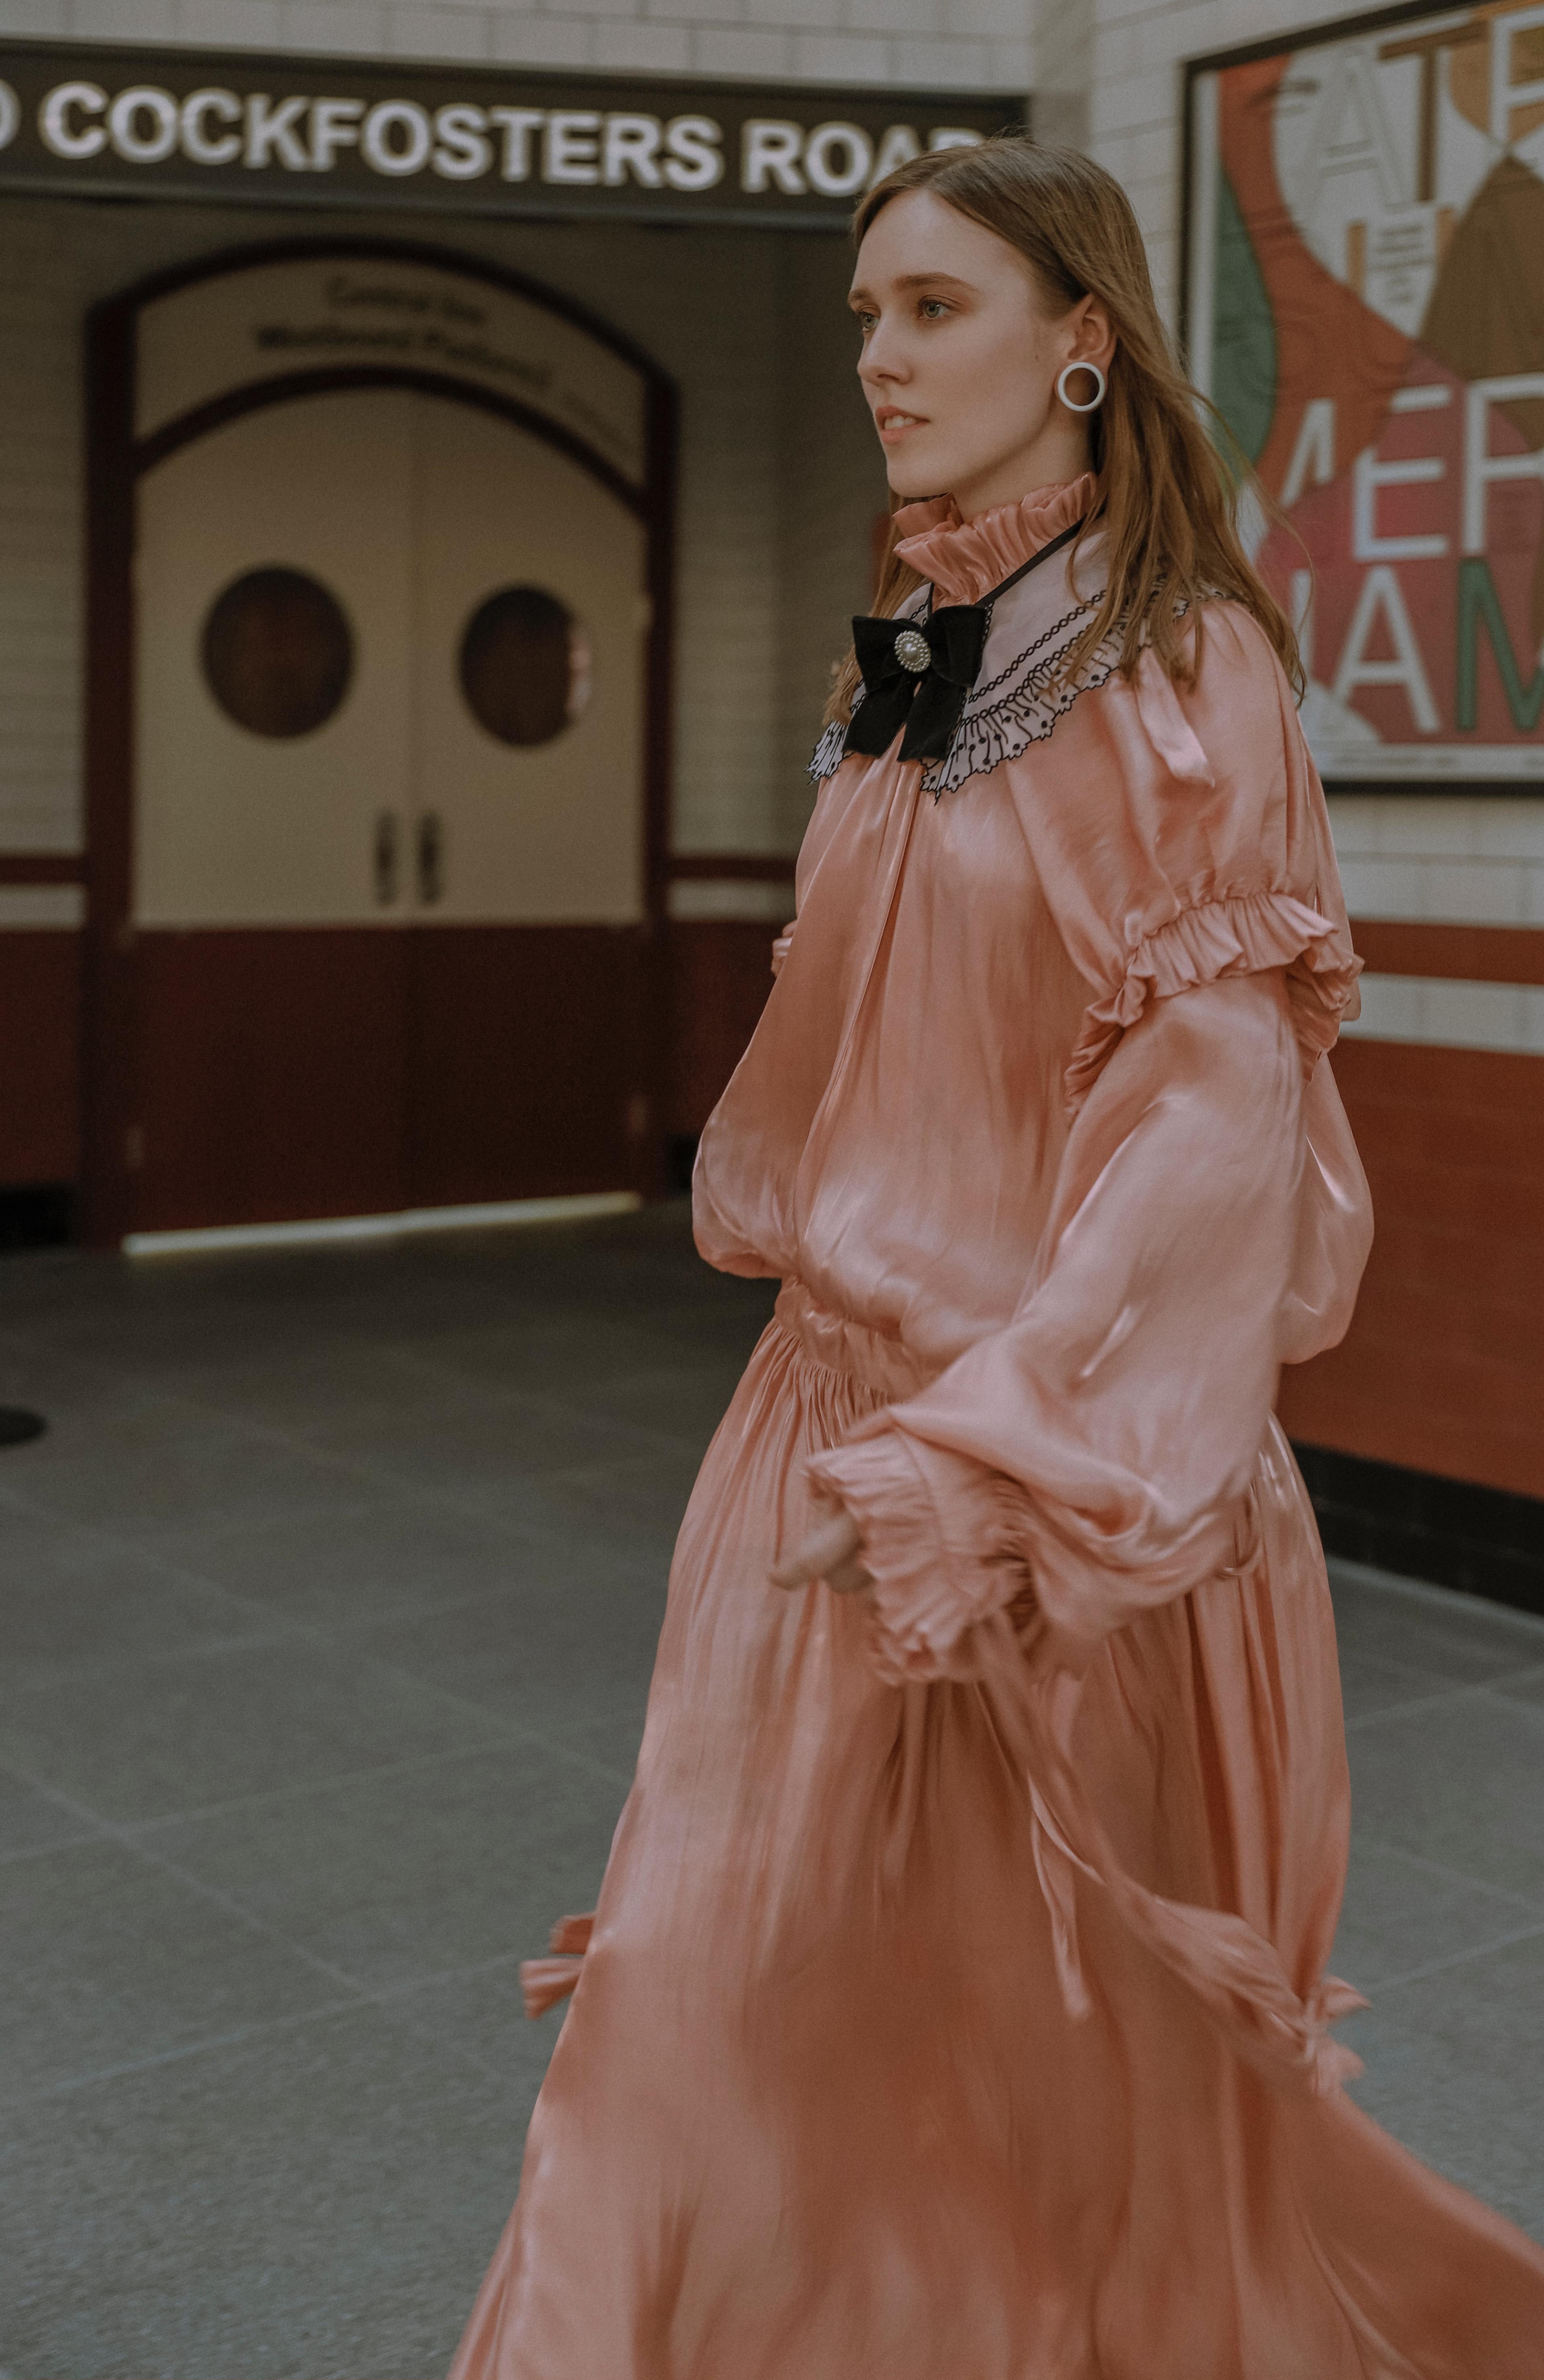
A sure-fire way to alter the mood of an image is by changing aspects like: fabrics, textures and lighting. Heavier, darker, rugged, and more structured details give off a masculine aura and intensify the atmosphere. On the contrary, details that are lighter in color, smoother in texture, and free flowing tend to have a softer, more feminine tone. And to clear any confusion, this isn't about gender, or being "boyish" or "girly"; this is solely in relation to masculine and feminine energies.
Colors also shift the emotional interpretations of photos. Using somber colors like: black, navy blue, grey, or maroon; versus happy, vibrant colors like: yellow, lime green, bubblegum pink, or fuchsia, can instantly give you a photo that looks completely different. To make the mood more dramatic or powerful, add bold shades like: burgundy, burnt orange or golden yellow.
Communication with your team on this topic is vital, as you will all be working together to change the mood through hair, makeup, styling, lighting, set design, modeling and any other task that takes place on the day of the shoot. By interchanging these moods throughout the photo series, you can control the emotions of your viewer and maintain their attention.
The one thing that's going to hold the entire shoot together is cohesivity. Do all the images look like they belong to the same theme? Do your model's facial expressions and body language match the changes in the mood and atmosphere? Only choose your best images and make sure everything flows together without having to think twice about it.
Post Production
Post production can be an extremely important part of the modern day editorial process. If your photos didn't initially obtain the results you wanted, you still have a chance to double back and save the shoot. This may be the time to ask someone to either edit your photos, or give you their honest opinion on how to improve them. Question the person assisting you as to what they felt when first looking at your shoot. If they don't answer along the lines of what you're looking for, express which emotions you were aiming to bring forth and ask what possible changes could be made in order to achieve that. Take this new perspective and use it to make your final revisions before releasing your art to the public.
Post production doesn’t have to be intimidating! Color grading, as well as adding effects and filters, are the easiest ways to add final touches towards the overall vibe of your shoot. Some of my favorite beginner-friendly tools for instant improvements include: adding a vignette, boosting up the saturation, or brightening the contrast. Along with these, there are many more complex techniques in photoshop that can dramatically alter an image, which is why some people choose to make post production their main form of art. With this medium, you can start with a simple photo and spend the bulk of your time creating your own reality through retouching and editing. There's an endless array of possibilities for artists of all skill levels, so dip your feet in and see what you can create!
The moral of the story is to tell a story! Even if you don't use the exact methods listed above (as they're all subjective), you now know the keys to properly bringing your visions to life. I hope this article leads you down a path of beautifully executed creative expressions; stay unique and keep creating freely!
Narrated By
| Katherine Berg
about the author
Katherine Berg
Multidisciplinary Artists
Katherine is an artist, vegan activist, and the founder and curator of Creating Freely Magazine. She’s passionate about living on her own terms and maximizing her potential.
edited by
Katherine Berg
Multidisciplinary Artists
Katherine is an artist, vegan activist, and the founder and curator of Creating Freely Magazine. She’s passionate about living on her own terms and maximizing her potential.